接下來,我們來看一下前端的網頁程式怎麼做吧,撇開始用複雜的web framework,這裡指先做一個HttpServlet的範例,我們用它來看看JavaEE 6做了些甚麼更動。
熟悉Eclipse的朋友們,產生Servlet的方式還是一樣,右鍵Project --> New --> Servlet,我們產生一個叫做MasterServlet的Servlet出來。
當結束後,Eclipsse自動幫你產生了下列程式碼,
package blogjee6;
import java.io.IOException;
...
/**
* Servlet implementation class MasterServlet
*/
@WebServlet("/MasterServlet")
public class MasterServlet extends HttpServlet {
private static final long serialVersionUID = 1L;
/**
* @see HttpServlet#HttpServlet()
*/
public MasterServlet() {
super();
// TODO Auto-generated constructor stub
}
/**
* @see HttpServlet#doGet(HttpServletRequest request, HttpServletResponse response)
*/
protected void doGet(HttpServletRequest request, HttpServletResponse response) throws ServletException, IOException {
// TODO Auto-generated method stub
}
}
請注意,在class上面有個新的annotation叫做@WebServlet,JavaEE 6的想法是多利用annotation的方式將資訊可以附加在程式碼之中,@WebServlet就是用來指定此HttpServlet所接受HTTP request的URI資訊。你可能懷疑,那傳統的web.xml到哪裡去了呢? 的確,再產生了這個HttpServlet之後,你到WEB-INF下面看一下,Eclipse現在不會自動幫你產生對應的web.xml以及其中的Servlet設定資料,一切資料現在都在class的annotation之中了!
但web.xml並不是就此失效或不再使用,其實,你還是可以使用web.xml的傳統方式來去指定,指示通常是在deploy階段有需要特定的更動才會使用。
我們需要呼叫前一篇文章所產生的EJB做資料查詢,首先,我們需要container能夠幫我們inject入此EJB instance,我們只需要在MasterServlet的property中加入此行:
@EJB MasterFacade info;
接著在doGet method之中加入下列程式碼以產生網頁:
Master master = info.queryMaster(1L);
PrintWriter out = response.getWriter();
out.println("<html><body>");
out.println("<h1>");
out.println(master.getMasterId() + ", " + master.getCol1() + ", " + master.getCol2());
out.println("</h1>");
List<Detail> details = master.getDetails();
for (Detail detail : details) {
out.println("<h2>");
out.println(detail.getDetailId() + ", " + detail.getCol1());
out.println("</h2>");
}
out.println("</body></html>");
老實說,少了context setup,interface lookup...等事情,就這樣直接當作POJO使用,是比以前爽度提升太多了...
連接到http://localhost:8080/BlogJEE6/MasterServlet,你應該可以看到你在MASTER與DETAIL資料庫table中的資料。
RESTful Service開發
系統與功能的開發,通常會伴隨著給人看的介面以及給其他系統進行資料交換的介面,近年來在企業內部遠端功能呼叫或是資料查詢,通常是使用Web Service的方式以SOAP (舊名為Simple Object Access Protocol) 訊息做交換,SOAP一方面是標準,一方面也相當成熟有一堆相關的標準去支援安全性、交易一制性...等的功能。只是... SOAP可以一點都不simple,相對的實在是有點肥,也因此,很多人都使用HTTP + XML/JSON的方式做自己的資料介面,RESTful就算是這一類的做法吧。
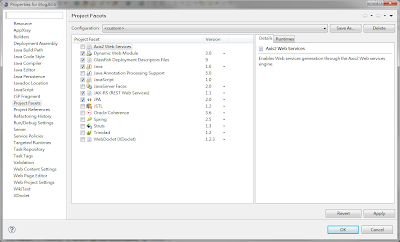
首先,你需要在Project Facet中多選個JAX-RS。右鍵Project --> Properties 再選Project Facet就可,記得,當你勾選時,下方會有紅色的Further configuration選項讓你進行細部設定。
在這裡,我把JAX-RS Servlet的URL mapping指定為/rest/*,代表所有在/rest/之下的URI代表就是RESTful Service。
我們想產生一個查詢Master與附屬Detail資料的RESTful Service,回傳的資料以XML的格式做為表示,我們可以在Eclipse中右鍵Project --> RESTful Web Service from Pattern (Java EE 6),並在對話框中輸入對應的資料:
package blogjee6;
import javax.ws.rs.Consumes;
...
@Path("generic")
public class MasterResource {
@SuppressWarnings("unused")
@Context
private UriInfo context;
/**
* Default constructor.
*/
public MasterResource() {
// TODO Auto-generated constructor stub
}
/**
* Retrieves representation of an instance of MasterResource
* @return an instance of String
*/
@GET
@Produces("application/xml")
public String getXml() {
// TODO return proper representation object
throw new UnsupportedOperationException();
}
/**
* PUT method for updating or creating an instance of MasterResource
* @param content representation for the resource
* @return an HTTP response with content of the updated or created resource.
*/
@PUT
@Consumes("application/xml")
public void putXml(String content) {
}
}
我們希望的是其他的應用程式可以透過某特定的URI去查特定Master資料,例如:透過/master/1我們可以查到id為1的Master與對應Detail資料。這個資訊我們可以透過@Path("/master_old/{masterId}"),以@Path annotation指定URI資訊,另外在中間放一個{masterId}的"參數",以方便動態帶入不同的查詢條件。
而在getXml() method之前,有兩個annotation @GET與@Produces,分別代表此method所處理的HTTP request以及回傳的MIME-type。
為了我們的需求,我們需要做一些簡單的修改:
@GET
@Produces("application/xml")
public String getXml(@PathParam("masterId") String masterId) {
這裡getXml() method多了一個masterId input String,我們在這個String之前加了一個annotation @PathParam("masterId"),代表了這個String資料會來自於@Path之中{masterId}"參數"。
下來就是填空了,把getXml()的內容透過呼叫MasterFacade EJB完成。一樣的,我們需先宣告一個MasterFacade讓container來inject。
@EJB MasterFacade info;
將下列的code加入getXml()之中:
String result = "";
Master master = null;
if (masterId != null && !"".equals(masterId)) {
master = info.queryMaster(Long.parseLong(masterId));
}
if (master != null) {
result += "<master>";
result += "<master_id>" + master.getMasterId() + "</master_id>";
result += "<col1>" + master.getCol1() + "</col1>";
result += "<col2>" + master.getCol2() + "</col2>";
if (master.getDetails().size() > 0) {
result += "<details>";
for (Detail detail : master.getDetails()) {
result += "<detail_id>" + detail.getDetailId() + "</detail_id>";
result += "<col1>" + detail.getCol1() + "</col1>";
}
result += "</details>";
}
result += "</master>";
}
return result;
最後,有一件事情,你需要在MasterRource class之前在加上一個annotation @Stateless,用意是讓container 能夠管這個class,也讓你的class呼叫EJB才不會出問題。
連到http://localhost:8080/BlogJEE6/rest/master/1試試看吧,你應該可以看到XML資料了!


